I met Richard through a free Texas Hold-Em poker game that the bar used to hold a couple times a week. On the nights that we got knocked out of the tournament early we would play a few games of chess . This didn't happen often as we both were pretty good poker players and would oftentimes reach the final table at the end of the night.
Over a two year period Richard and I played a total of seven games with the first three being unrecorded. After the first three games our score stood tied at 1.5 - 1.5 with one win a piece and a draw. This, the fourth game, was recorded and typical of all our games, it was a very hard-fought battle.
White: D. Thomas Moniz
Black: Richard Stamm
The Mousetrap
Indianapolis, IN (1)
Time Controls: None
02.17.2009
Opening: C60 Ruy Lopez
*engine analysis by Komodo 8 at a minimum depth of (21) unless otherwise noted.
*click all diagrams and photos to enlarge
1.e4 e5 2.Nf3 Nf6 3.Bb5 Nge7 (0.31)

The Cozio Defence is the seventh most popular continuation in the Ruy Lopez. Some of the strongest players in the world have essayed this line, notably Aronian, Nakamura, Karjakin, Ivanchuk, Short, Larsen, Steinitz and Morphy.
Other popular continuations (in order of popularity) are as follows:
- 3...a6 (0.14) Morphy's Defence.
- 3...Nf6 (0.24) The Berlin Defence..
- 3...Bc5 (0.31) The Classical Defence.
- 3...d6 (0.41) The Steinitz Defence.
- 3...f5 (0.47) The Schliemann/Jaenisch Defence.
- 3...Nd4 (0.30) Bird's Defence.
- 3...g6 (0.44) Smyslov's Defence.

The most natural continuation, gaining queenside space and a tempo on the bishop. Other considerations include:
- 5...d6 (0.44) A tepid but solid choice as in Shahade, J. - Benjamin, J., New York 2003 (0-1)
- 5...g6 (0.35) The choice of top players, preferring a fianchetto of the bishop on g7, but this didn't bode well for the top French player in Sjugirov, S. - Vachier-Lagrave, M., Moscow 2011 (1-0)
- 5...Ng6!? (0.34) Komodo's choice. The knight makes way for the bishops development but may be a bit awkward here on g6 as in Morovic Fernadez, I. - Larsen, B., Pinamar 2002 (1-0)
6.Bb3 h6 7.c3 (0.61)

A cautious but solid approach to the position. I had been stung for a loss in our previous game after playing too recklessly in the opening and lost a pawn so had decided to play a bit more conservatively in this game... well in the opening phases anyway. The move prepares d2-d4 and also gives the bishop on b3 a place of refuge in case of ...Na5.
Komodo instead suggests that 7.d4 (0.74) is the more dynamic way to play for an advantage but not by much.
...Ng6 8.d4 exd4N (0.83)
A novelty in the position but not a very profound one. Black dissolves some of the central tension but this may work in White's favor, so perhaps instead:
9.cxd4 Bb7 10.Re1 (0.48)
A novelty in the position but not a very profound one. Black dissolves some of the central tension but this may work in White's favor, so perhaps instead:
- 8...Bb7N (0.56) Komodo's top choice and a novelty as well! This would of been a much better continuation for Black, simply developing the bishop and keeping the central tension intact.
- 8...Na5 (0.66) A more aggressive try although somewhat unprincipled. It does have some practical merits though as White will probably have to chew up some clock to figure out how to proceed with his bishop on b3.
- 8...d6 (0.78) This looks solid but probably too passive. White gets too much liberty as in Panchanathan, M.C. - Varshavsky, E., Philadelphia 2006 (1-0)
9.cxd4 Bb7 10.Re1 (0.48)

Still playing conservatively. White develops the rook on the e-line opposite the black king while bolstering the e4-pawn.
Komodo instead prefers 10.Bd2!? (0.79) which temporarily takes away the b4-square from the black bishop on f8. A logical idea even though the bishop looks a bit funny on d2. However it's hard to argue with the engines evaluation here so I will definitely consider it next time should this position ever arise again.
Be7 11.Nbd2 (0.38)
The downside of course to White's conventional play is that Black has an easy game with no worries. A concession I was willing to accept.
Komodo prefers a more dynamic 11.Nc3 (0.71) with a solid plus for White.
 |
| The Conservative Driver |
The conservative driver eventually reaches his destination, albeit a little slower. Notice the protective measures; goggles, gloves and leather driving vest... also, both hands on the wheel.
...O-O 12.Nf1 (0.38)
Heading for e3 or possibly g3 in some lines. This redeployment of the knight is a common idea in the Ruy Lopez.
...d6 13.Ng3 Bf6 (0.62)

Although the bishop looks somewhat awkwardly placed here Black's position is quite tenable. White's central dominance however gives him an edge.
Still how does White proceed? What would you do here?
A picture to hide White's next move.
14.Nf5!? (0.27)
"Knife to f5" as GM Ben Finegold often says. The knight is generally annoying sitting here on f5 and Black is oftentimes compelled to try and remove this intrusive guest at the cost of delaying his own laid plans.
Objectively speaking the knight exerts pressure on the black kingside and may redeploy to the e3-square in some instances. The move isn't even in Komodo's top three but from a practical standpoint it's an excellent try and besides I have ulterior motives...
Komodo's top three:
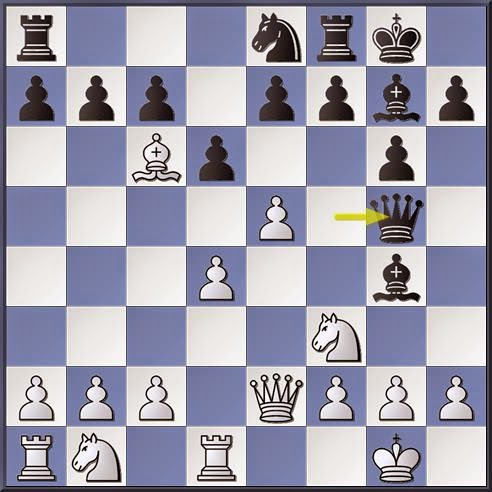
...Re8 (0.69)

Developing the rook to the half-opened e-file, exerting pressure on the white pawn there. A natural looking move but perhaps a bit too sluggish. Black could play more dynamically here with either
So it's White to move here. What would you do?
15.Bxh6!! (0.00)

A fantastic practical sacrifice! Don't let Komodo's (0.00) evaluation fool you. This is a very powerful move, a psychological juggernaut for Black.
During the game I couldn't calculate whether or not the sac would be fully sound but knew that the resulting attack would be very strong and so just went with it. This shift away from my previous conservative play must of shocked my opponent, a value which can never be underestimated in a move. Another facet of the sacrifice is that there is only one way to refute which is not so obvious. I certainly had no awareness of it during the game but did my opponent?
It's Black to move. What would you do here?
...gxh6? (1.93)
The bishop cannot be taken without first eliminating or deflecting the bishop on b3 with 15...Na5! (0.00). Well done if you found this not so obvious key move.
After this misstep White is definitely winning but converting this advantage to victory will take a bit of work and as the old saying goes, "...there's many a slip 'twixt the cup and the lip.."
16.Nxh6 Kg7 17.Nxf7 Qe7 18.Qd2 (1.97)

What's Black's best defense here?
...Rh8! (2.05)
White threatened the devastating Qh6+. Stamm finds the best defense giving up the exchange to blunt this deadly attack. No credit for anything else as all other options leave Black much much worse. i.e.
19.Nxh8 Nxh8? (4.61)
This makes little sense and the knight will lose a tempo getting back into play. Best was the natural recapture, 19...Rxh8 (2.04) which brings the rook into play at the same time.
20.Bd5 Ng6 21.Rac1 Nd8 22.Bxb7 Nxb7 (5.71)

So it seems that Black has weathered the attack for the time being or has he?
23.Rc6?! (2.07)

The idea was to double rooks on the file while stopping the advance of Black's c-pawn but this wasn't too well thought out as now the rook will have to lose time evading a threat after Black's next move.
The best try was 23.e5! (5.73). Here White wins a piece after 23...dxe5 24.dxe5 Nxe5 25.Qf4 Nxf3+ 26.Qxf3 Qf7 27.Qxb7.
...Nd8 24.Rc2 Ne6 (2.63)

Black has used his gifted tempi wisely and brings the knight to a more active square adding further pressure to the d4-pawn.
White has many good options at his disposal but what is the best way to proceed here?
25.Rec1?! (1.17)

On the surface a principled idea, doubling rooks on the half-opened file but a closer inspection reveals a faulty plan. The text yields Black a way to somewhat stabilize his position.
Instead Komodo finds much better continuations with:
So how does Black capitalize on White's inaccuracy? What would you play here?

Chess, good beer and the warm late afternoon sunshine of a lazy summer day at the Mousetrap. A very satisfying combination!
...Rc8?! (2.34)

White is granted a temporary reprieve as Black fails to find the best reply. The text is much too passive and relegates the rook to a less than optimum role.
The best try was 25...c5! (1.09). The point being that after
26.Qa5 (1.26)

Another inaccuracy on my part. The idea is simple; attack both the a6 and c7 pawns but this weakens the support of the d4-pawn. There were better alternatives namely:
...Qd7? (3.42)

Apparently this is a mistake according to Komodo. On the surface it is an odd looking move whose purpose is hard to discern. Is Black clearing the e7-square for his knight or bishop? Is the queen trying to maneuver to the queenside? Regardless, Black misses the best defensive chance with the aforementioned 26...c5 (1.26)
So how does White capitalize on Black's error?

A late afternoon Autumn game at the Mousetrap. This is my fall set. Notice the pumpkin orange and mash potato white pieces along with the gravy brown and tan board. Sorry no turkey but more beer is on the way!
27.Qxa6 (1.97)

Not the best but probably still winning. Much stronger was 27.d5! (3.42) and now after ...Nc5 28.b4 Black has many ways to make his situation much worse. i.e.
So how should Black take advantage of this lapse by White?
The Mousetrap offers free pool from 11am-7pm everyday!
...Nxd4?! (4.09)
This pawn grab only makes matters worse for Black. Stamm might of rationed that the position after 28.Qxc8 Nxf3 29.gxf3 Qxc8 30.Rxc7+ Qxc7 31.Rxc7+ Kh6 would be OK for him as he has two minor pieces against a lone rook but White's 6-2 pawn majority will tell here.
Instead, Black's best try was 27...Ngf4 (1.55) with fighting chances although objectively White is still technically winning.
28.Nxd4 Bxd4 (4.11)

So Black has won back a pawn but still sits in a very bad way despite the material balance being almost equal (rook + 3 pawns vs 2 minor pieces). His king is wide open and White's three connected passed pawns will be too much for Black to cope with.
So what's the best way for White to continue here?

29.Rc6? (0.00)

A careless mistake that throws everything away. It's true that the rook blocks the black queen from its protection of the b5-pawn and stops the advance of the black b-pawn but it's also quite vulnerable here to say a knight landing on e7. With this oversight the slate is wiped clean and Black is right back in the game.
Instead White should play 29.Qxc8! (3.81) and the simplifications after ...Qxc8 30.Rxc7+ Qxc7 31.Rxc7+ Kf6 will be much easier to navigate. Essentially White's rook and pawn mass will dominate Black's two minor pieces in the ensuing endgame. During the actual game I may have wrongfully concluded that it was too dangerous to go into this endgame with such an imbalance.
...Ne7 30.Qxb5!? (-0.35)

Wrongfully assessing that giving back the exchange here for another pawn and the further liquidation of forces would be enough to maintain a winning edge. Now the best White can hope for is a draw and he may even have to fight for it!
...Nxc6 31.Qxc6 (-0.45)
The other main alternative of course is
...Qxc6 32.Rxc6 Bb6 (0.00)
Komodo evaluates the position as dead even. White has four pawns for the piece but the black king is in perfect position to help defend against the pawn mass. Instead of the text Black might of tried
33.Kf1 Kf6 34.h4 Ke5 35.f3 Rf8 36.Ke2 Kf4 37.b4 (-0.11)

The game has progresses along a logical and predictable path; White trying to mobilize his kingside pawn mass and bring his king into play while Black has been moving his king and rook into action against it.
Whites last move is aimed at dislodging the bishop on b6 after a4-a5 to weaken the c7-pawn but this looks a bit slow and what of the pawn on h4, how is White to defend it?
Black to play here. What would you do?

Tuesday nights at the Mousetrap is "Bourbon for the Brain, Jazz for the Soul" featuring the saxophone of Nick Gerlach of the Twin Cats and an all star cast of Indy's best musicians playing a night of sultry jazz and soul. No cover!
...Rh8? ( 1.07)

It was a mistake to go after the h-pawn as White's queenside play is quite dangerous. There were two better ways to deal with the position:
So how does White continue here?

A typical promotional event poster at the Mousetrap. This one is for one of Indiana's premier bands of past lore, The Why Store. Originating in 1988 in Muncie, IN as "Emerald City", the band went through several lineup changes and would eventually change their name in 1992 after a local Muncie haberdashery of the same name. The band peaked in 1996 shorty after signing with Way Cool Records -a subsidiary of MCA Records, when their song "Lack Of Water" topped the Billboard AAA charts for two straight weeks.
38.a4! (1.07)

The obvious reply and the only way to play for the win. The threat of course is a4-a5 and after the bishop moves then Rxc7.
...Rh7 (1.23)
To deal with the aforementioned threat. Also good was 38...Rb8 (1.06) with the idea of 39.a5 Bd4 40.Rxc7 Rxb4 and things are probably heading for a draw.
39.a5 Ba7 40.Ra6 (1.02)

The bishop is under attack so how should Black deal with this crude threat?

More promotional event posters at the Mousetrap. This sample collection is the work of Indiana's own Lou Carranza of Tortuga Graphix
...Bb8?? (6.10)

A horrible miscalculation which loses on the spot! Instead either:
So how does White capitalize on this blunder?

The Mousetrap Indianapolis. One of Indy's oldest watering holes and so much more!
41.Ra8! (6.10)

Of course. Now Black will lose the bishop (or rook) and soon after the game. It's not clear whether Black was already lost before his 40th move but my feeling is that he could of possibly held the draw with accurate play. An unfortunate turn however eliminates his chances and the punishment is swift.
The rest of the game sees Black in his death throws, giving up the rook (instead of the bishop) to grab another pawn, but this proves to be futile as White mops up quite easily.
...Rh8 42.a6 c5 43.bxc5 dxc5 44.a7 Bxa7 (18.75)

45.Rxh8 c4 46.h5 Kg5 47.h6 Bd4 (25.66)

48.Rd8 Bf6 49.h7 Kg6 50.h8=Q Bxh8 51.Rxh8 (mate #12)
Resigns
Heading for e3 or possibly g3 in some lines. This redeployment of the knight is a common idea in the Ruy Lopez.
...d6 13.Ng3 Bf6 (0.62)
Although the bishop looks somewhat awkwardly placed here Black's position is quite tenable. White's central dominance however gives him an edge.
Still how does White proceed? What would you do here?
A picture to hide White's next move.
 |
| Mousetrap: the board game |
14.Nf5!? (0.27)
"Knife to f5" as GM Ben Finegold often says. The knight is generally annoying sitting here on f5 and Black is oftentimes compelled to try and remove this intrusive guest at the cost of delaying his own laid plans.
Objectively speaking the knight exerts pressure on the black kingside and may redeploy to the e3-square in some instances. The move isn't even in Komodo's top three but from a practical standpoint it's an excellent try and besides I have ulterior motives...
Komodo's top three:
- 14.Qd2 (0.64)
- 14.Bd5 (0.54)
- 14.d5 (0.44)
...Re8 (0.69)
Developing the rook to the half-opened e-file, exerting pressure on the white pawn there. A natural looking move but perhaps a bit too sluggish. Black could play more dynamically here with either
- 14...Nce7 (0.29) Challenging the knife on f5 or
- 14...Na5 (0.30) Trying to remove the powerful bishop on b3 or at least challenging it's control of the a2-h7 diagonal.
So it's White to move here. What would you do?
 |
| The Vox F5 folding knife |
Just a humorous coincidence. It would probably make a very clever birthday gift for the aforementioned Ben Finegold however.
A fantastic practical sacrifice! Don't let Komodo's (0.00) evaluation fool you. This is a very powerful move, a psychological juggernaut for Black.
During the game I couldn't calculate whether or not the sac would be fully sound but knew that the resulting attack would be very strong and so just went with it. This shift away from my previous conservative play must of shocked my opponent, a value which can never be underestimated in a move. Another facet of the sacrifice is that there is only one way to refute which is not so obvious. I certainly had no awareness of it during the game but did my opponent?
It's Black to move. What would you do here?
 |
| A calculated risk |
...gxh6? (1.93)
The bishop cannot be taken without first eliminating or deflecting the bishop on b3 with 15...Na5! (0.00). Well done if you found this not so obvious key move.
After this misstep White is definitely winning but converting this advantage to victory will take a bit of work and as the old saying goes, "...there's many a slip 'twixt the cup and the lip.."
16.Nxh6 Kg7 17.Nxf7 Qe7 18.Qd2 (1.97)
What's Black's best defense here?
 |
| Mouse'n Impossible |
...Rh8! (2.05)
White threatened the devastating Qh6+. Stamm finds the best defense giving up the exchange to blunt this deadly attack. No credit for anything else as all other options leave Black much much worse. i.e.
- 18...Na5 (11.41) runs into 19.Qh6+ Kg8 20.Qxg6+ which is simply a mauling.
- 18...Nd8 (#11) trying to remove the white knight fails to 19.Qh6+ Kg8 and now the discovered check 20.Nxd8+! will lead to mate.
- 18...Qxf7 (2.91) sacrificing the queen as the second best defense! i.e. 19.Bxf7 Kxf7 with three pieces for the queen + three pawns. The king is out of danger for the moment but it's still a technical win for White.
19.Nxh8 Nxh8? (4.61)
This makes little sense and the knight will lose a tempo getting back into play. Best was the natural recapture, 19...Rxh8 (2.04) which brings the rook into play at the same time.
20.Bd5 Ng6 21.Rac1 Nd8 22.Bxb7 Nxb7 (5.71)
So it seems that Black has weathered the attack for the time being or has he?
23.Rc6?! (2.07)
The idea was to double rooks on the file while stopping the advance of Black's c-pawn but this wasn't too well thought out as now the rook will have to lose time evading a threat after Black's next move.
The best try was 23.e5! (5.73). Here White wins a piece after 23...dxe5 24.dxe5 Nxe5 25.Qf4 Nxf3+ 26.Qxf3 Qf7 27.Qxb7.
...Nd8 24.Rc2 Ne6 (2.63)
Black has used his gifted tempi wisely and brings the knight to a more active square adding further pressure to the d4-pawn.
White has many good options at his disposal but what is the best way to proceed here?
 |
| A less than purrrrfect ending |
25.Rec1?! (1.17)
On the surface a principled idea, doubling rooks on the half-opened file but a closer inspection reveals a faulty plan. The text yields Black a way to somewhat stabilize his position.
Instead Komodo finds much better continuations with:
- 25.e5 (2.63)
- 25.d5 (2.59)
- 25.Qe3 (2.26)
- 25.Rc3 (1.95)
So how does Black capitalize on White's inaccuracy? What would you play here?
Chess, good beer and the warm late afternoon sunshine of a lazy summer day at the Mousetrap. A very satisfying combination!
...Rc8?! (2.34)
White is granted a temporary reprieve as Black fails to find the best reply. The text is much too passive and relegates the rook to a less than optimum role.
The best try was 25...c5! (1.09). The point being that after
- 26.e5 dxe5 27.dxe5 Nxe5 28.Nxe5 Bxe5 (1.22) Black may well be able to hold the game.
- 26.dxc5 dxc5 27.Qe3 (27.e5 transposes to the line above after Nxe5 28.Nxe5 Bxe5) ...Ne5 (27...c4? would be a mistake as after 28.b3 cxb3 29.axb3 (1.79) the position is most likely winning for White) 28.Nxe5 Bxe5 (0.77) with good drawing chances for Black.
26.Qa5 (1.26)
Another inaccuracy on my part. The idea is simple; attack both the a6 and c7 pawns but this weakens the support of the d4-pawn. There were better alternatives namely:
- 26.Qe3 (2.46)
- 26.d5 (1.74)
- 26.Rc6 (1.55)
...Qd7? (3.42)
Apparently this is a mistake according to Komodo. On the surface it is an odd looking move whose purpose is hard to discern. Is Black clearing the e7-square for his knight or bishop? Is the queen trying to maneuver to the queenside? Regardless, Black misses the best defensive chance with the aforementioned 26...c5 (1.26)
So how does White capitalize on Black's error?
A late afternoon Autumn game at the Mousetrap. This is my fall set. Notice the pumpkin orange and mash potato white pieces along with the gravy brown and tan board. Sorry no turkey but more beer is on the way!
27.Qxa6 (1.97)
Not the best but probably still winning. Much stronger was 27.d5! (3.42) and now after ...Nc5 28.b4 Black has many ways to make his situation much worse. i.e.
- 28...Nxe4? (6.27) runs into 29.Rxc7 (29...Rxc7 is even worse for Black after 30.Rxc7, etc.) 29...Kh6 30.Rxc8 (30.Rxd7?? Rxc1+) ...Nf4 31.Qa3 Qg4 32.g3 Nxd5 33.Qd3 and White is up two exchanges plus two pawns.
- 28...Nb7? (7.15) could possibly even be worse after 29.Rxc7 Ne7 30.Qb6 Rxc7 31.Rxc7 Qg4 32.Rxb7 Qxe4 33.Qe3, etc.
- 28...Bb2 (3.61) is the best try but White stays on top after 29.Rxb2 (29.bxc5 is another way to go and now ...Bxc1 30.Rxc1 Nf4 31.Nd4 Qg4 32.Ne6+ Nxe6 33.dxe6 Qxe6 34.Qxa6 , etc.) 29...Nd3 30.Qa3 Nxc1 31.Qc3+ Kg8 32.Qxc1, etc.
So how should Black take advantage of this lapse by White?
 |
| Pool room @ the Mousetrap |
The Mousetrap offers free pool from 11am-7pm everyday!
...Nxd4?! (4.09)
This pawn grab only makes matters worse for Black. Stamm might of rationed that the position after 28.Qxc8 Nxf3 29.gxf3 Qxc8 30.Rxc7+ Qxc7 31.Rxc7+ Kh6 would be OK for him as he has two minor pieces against a lone rook but White's 6-2 pawn majority will tell here.
Instead, Black's best try was 27...Ngf4 (1.55) with fighting chances although objectively White is still technically winning.
28.Nxd4 Bxd4 (4.11)
So Black has won back a pawn but still sits in a very bad way despite the material balance being almost equal (rook + 3 pawns vs 2 minor pieces). His king is wide open and White's three connected passed pawns will be too much for Black to cope with.
So what's the best way for White to continue here?

Thursday nights at the Mousetrap is "Altered Thurzdaze". A mix of DJ's from around the country mixing up a healthy dose of electronic, dubsteb, broken beats, etc., for you listening and dancing pleasure.
29.Rc6? (0.00)
A careless mistake that throws everything away. It's true that the rook blocks the black queen from its protection of the b5-pawn and stops the advance of the black b-pawn but it's also quite vulnerable here to say a knight landing on e7. With this oversight the slate is wiped clean and Black is right back in the game.
Instead White should play 29.Qxc8! (3.81) and the simplifications after ...Qxc8 30.Rxc7+ Qxc7 31.Rxc7+ Kf6 will be much easier to navigate. Essentially White's rook and pawn mass will dominate Black's two minor pieces in the ensuing endgame. During the actual game I may have wrongfully concluded that it was too dangerous to go into this endgame with such an imbalance.
...Ne7 30.Qxb5!? (-0.35)
Wrongfully assessing that giving back the exchange here for another pawn and the further liquidation of forces would be enough to maintain a winning edge. Now the best White can hope for is a draw and he may even have to fight for it!
...Nxc6 31.Qxc6 (-0.45)
The other main alternative of course is
- 31.Rxc6 (0.34) which Komodo evaluates as about the same but I didn't see a good reason to put myself in a self-pin.
- 31.Qg5+!? (-0.50) and gives ...Kf8 32.Rxc6! with the point being that if ...Qxc6?! (32...Ra8! 33.Rc1 keeps a small edge for Black) then 33.Qf5+ Ke7 34.Qh7+ (0.00) is a forced perpetual.
...Qxc6 32.Rxc6 Bb6 (0.00)
Komodo evaluates the position as dead even. White has four pawns for the piece but the black king is in perfect position to help defend against the pawn mass. Instead of the text Black might of tried
- 32...Kf6 (-0.42) but after 33.Kf1 Ke5 34.f3 Bxb2 35.a4 the game will most likely fizzle out into a draw.
- 32...Bxb2 (-0.28) straight away gives White more options but after 33.g3 Kf6 34.f4 Bd4+ 35.Kg2 the result should still be a draw with proper play.
33.Kf1 Kf6 34.h4 Ke5 35.f3 Rf8 36.Ke2 Kf4 37.b4 (-0.11)
The game has progresses along a logical and predictable path; White trying to mobilize his kingside pawn mass and bring his king into play while Black has been moving his king and rook into action against it.
Whites last move is aimed at dislodging the bishop on b6 after a4-a5 to weaken the c7-pawn but this looks a bit slow and what of the pawn on h4, how is White to defend it?
Black to play here. What would you do?

Tuesday nights at the Mousetrap is "Bourbon for the Brain, Jazz for the Soul" featuring the saxophone of Nick Gerlach of the Twin Cats and an all star cast of Indy's best musicians playing a night of sultry jazz and soul. No cover!
...Rh8? ( 1.07)
It was a mistake to go after the h-pawn as White's queenside play is quite dangerous. There were two better ways to deal with the position:
- 37...Ra8 (-0.11) is the straightforward approach. Now after 38.Rc2 there follows ...Ra4 39.Rb2 Bd4 40.Rc2 c5 41.bxc5 Bxc5 and Black is holding comfortably.
- 37...Rg8 (0.00) is a little trickier but manageable. After 38.a4 Rxg2+ 39.Kd3 Kxf3 40.a5 Be3 41.Rxc7 Rd2+ 42.Kc3 Kxe4 the position is dynamically even.
So how does White continue here?
A typical promotional event poster at the Mousetrap. This one is for one of Indiana's premier bands of past lore, The Why Store. Originating in 1988 in Muncie, IN as "Emerald City", the band went through several lineup changes and would eventually change their name in 1992 after a local Muncie haberdashery of the same name. The band peaked in 1996 shorty after signing with Way Cool Records -a subsidiary of MCA Records, when their song "Lack Of Water" topped the Billboard AAA charts for two straight weeks.
38.a4! (1.07)
The obvious reply and the only way to play for the win. The threat of course is a4-a5 and after the bishop moves then Rxc7.
...Rh7 (1.23)
To deal with the aforementioned threat. Also good was 38...Rb8 (1.06) with the idea of 39.a5 Bd4 40.Rxc7 Rxb4 and things are probably heading for a draw.
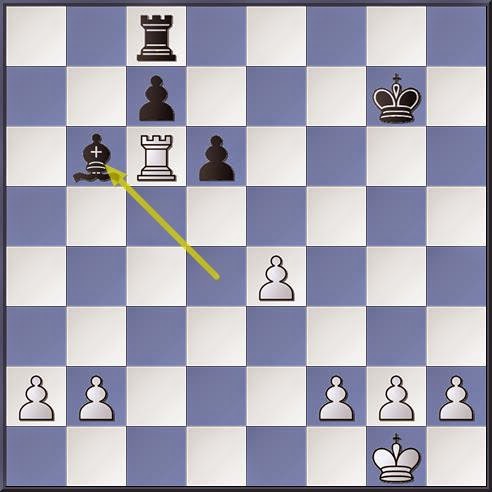
39.a5 Ba7 40.Ra6 (1.02)
The bishop is under attack so how should Black deal with this crude threat?
More promotional event posters at the Mousetrap. This sample collection is the work of Indiana's own Lou Carranza of Tortuga Graphix
...Bb8?? (6.10)
A horrible miscalculation which loses on the spot! Instead either:
- 40...Bg1 (1.04) or
- 40...Bd4 (1.27) keeps Black drawing chances alive.
So how does White capitalize on this blunder?
The Mousetrap Indianapolis. One of Indy's oldest watering holes and so much more!
41.Ra8! (6.10)
Of course. Now Black will lose the bishop (or rook) and soon after the game. It's not clear whether Black was already lost before his 40th move but my feeling is that he could of possibly held the draw with accurate play. An unfortunate turn however eliminates his chances and the punishment is swift.
The rest of the game sees Black in his death throws, giving up the rook (instead of the bishop) to grab another pawn, but this proves to be futile as White mops up quite easily.
...Rh8 42.a6 c5 43.bxc5 dxc5 44.a7 Bxa7 (18.75)
45.Rxh8 c4 46.h5 Kg5 47.h6 Bd4 (25.66)
48.Rd8 Bf6 49.h7 Kg6 50.h8=Q Bxh8 51.Rxh8 (mate #12)
Resigns
1-0
 |
| Final position |