The first place I stumbled upon was a small group of players that met in a local pizza joint where a weekly tournament was held . The tournament was run by Candidate Master, Don Urquhart. Over the years Don and I have played dozens of games and in all those encounters I have only beaten him twice (and one of those on time only!). Not unusual as he has me by over six hundred rating points!
Don played many types of openings back then... and very well as far as I could tell. After a while though he began to focus his opening repertoire in a very specific and narrow way. One opening structure began to permeate all this games when he played black regardless of how white opened the game. That opening was the Modern Defense (or Robatsch Defense). The logic was that since he didn't have the time to keep up on all the theory for the multitude of other openings out there he would instead focus all his energy into one opening system and become very proficient at it. From a practical standpoint this made perfect sense to me.
Now since he began playing this particular set up I too began to become familiar with the opening and the various structures that arose from it. After each of our games I would do extensive analysis on them with the help of the Chessmaster 3-D (Sony Playstation) -it's all I had back then! The program was geared mainly for playing against the computer but I found that I could circumvent this and enter in my games manually. Utilizing the engines evaluation I began to see the error of my ways. This crude engine, by today's standards, gave me new ideas and better avenues to pursue. The result was that I began to understand the opening and the resulting positions much more thoroughly and since we followed pretty specific lines of play this 'layer upon layer' of improvement continued to evolve and progress my game and understanding. Don benefited from this too as he had to adjust his play to the stronger and stronger moves, ideas and continuations that I brought to each subsequent game we played.
Then one day in analysis I discovered an interesting idea in a specific line we had been playing using a sub-optimal but still viable move. The thing which got my attention was that if Black played naturally a subtle trap could be set that was not so easy to see, especially in blitz or rapid play which was what we normally played most of the time. I committed the idea to memory and waited for an opportunity to spring it the next time an opportunity arose.
About a month later one did...
White: D. Thomas Moniz (1355)
Black: Donald Urquhart (1951)
Planet Pizza, Indianapolis, IN (3)
Time Controls: G/15+2
05.23.2000
Opening: B06 Modern Defense
*engine analysis by Komodo 8 at a minimum depth of (21) unless otherwise noted.
*click all diagrams and photos to enlarge
1.e4 g6 2.d4 Bg7 3.Nf3 (0.45)

The second most popular continuation and the line which we had been following in our games. Other well-worn tries include:
- 3.Nc3 (0.41) Kasparov, G. vs Radjabov, T., Moscow 2002 1-0
- 3.c4 (0.34) Ivanchuk, V. vs Kamsky, G., Moscow 2007 1/2-1/2
- 3.c3 (0.31) Kamsky, G. vs Shimanov, A., Tromso 2013 1-0
- 3.f4 (0.18) Bareev, E. vs Speelman, J., Debrecen 1992 0-1
...d6 4.Bc4 (0.25)
The main line is 4.Nc3 (0.37) but the text is a close second and of course I am following my prep.
...Nf6 5.Qe2 (0.25)

The old move was 5.Nc3 (0.19) but modern theory prefers the text and Komodo agrees.
...O-O 6.O-O Bg4 (0.24)
The other main way to play here is more passively with 6...c6 (0.29) but Urquhart remains true to this line of play which had been the norm in our previous games. The text is obviously more aggressive and there is no reason for him to deviate as he had been achieving crushing positions against me.
7.e5 (0.32)
The most aggressive continuation and the most popular. White gains space in the center and ramps up the tension.
Other popular continuations include:
- 7.h3 (0.23) Zatonskih, A. vs Istratescu, A., Gibraltar 2010 1/2-1/2
- 7,Rd1 (0.12) Aronian, A. vs Docx, S., Macedonia 2009 1-0
- 7.Nbd2 (0.11) Kramnik, V. vs Korotylev, A., Moscow 2007 1-0
...Ne8!? (0.27)

This rather ugly looking retreat is actually quite a viable way to play the position according to both Komodo and in grandmaster play (Benjamin, Hort, Keene, Suttles to name a few). Although the backward movement lessens the knights influence, the bishop on g7's scope is improved, lending a helping hand to the central conflict.
Other options include:
- 7...dxe5 (0.26) The most obvious try and played by top players, Shirov, Bologan and Ivanov.
- 7...Nh5!? (0.30) An interesting alternative found by Komodo and worthy of further research.
- 7...Nfd7 (0.54) Another find by Komodo but probably not as good as the other alternatives.
 |
| An Ambush by William Barns Wollen Oil on panel, c.1900 |
8.Rd1 (0.18)
This move first appeared in Adorjan-Hort, Budapest 1973 and has since cropped up a few times, notably in Shamkovich-Keene, 1980 and Garcia-Benjamin, 2000. The rook centralizes on the d-line eyeing the black queen opposite and discourages an immediate opening of the center.
Komodo instead suggests simple development with 8.Nbd2 (0.29) but by a very small margin.
...Nc6 (0.11)
The principled approach and the choice of Shamkovich in his game with Keene. Urquhart follows suit but former American champion, Joel Benjamin preferred instead a different approach with 8...Qc8!? (0.18) in his above referenced game with Garcia. Here the game continued with 9.Bg5 Nc6 10.Bd5 h6 11.Bh4 g5 12.Bg3 Nb4 13.Bb3 c6... and after a long fight Benjamin eventually forced Garcia's resignation on move 59.
9.Bd5!? (0.21)

It seems a little suspect to move the bishop twice while the queenside remains undeveloped but the merits in this case outweigh this argument. I'm fairly certain that the move was a product of Chessmaster 3D during an analysis session as it would seem unlikely that I would have come up with such an odd looking idea. Years later when I had checked the game with Chessbase I found that the move had been already been seen in master play, notably in the aforementioned Shamkovic-Keen and also in Adorjan-Hort in 1980 and 1973 respectively. So although it may appear as a "computer" looking move, it's origins are quite human.
OK but what's the move all about? The idea is quite simple. From the d5-square the bishop attacks the knight on c6 (and beyond -the pawn on b7 and the rook on a8) who is a primary watchdog of Black's central interests and in the event of a move such as ...e6, White is all too happy to snap off the knight (Bxc6). The other advantage to being on the d5-square is that the bishop also watches over his compatriot knight on f3 should the white queen suddenly be needed elsewhere.
 |
| Bishop Poised For Battle Hand painted miniature figurine |
...Qd7 (0.09)
The best continuation. Everything else gives White a comfortable edge. i.e.
- 9...dxe5 10.Bxc6 bxc6 11.dxe5 (0.75) White has the initiative and Black's structure is compromised.
- 9...Nb4 10.Bxb7 Rb8 11.h3 with complications that should favor White. i.e. 11...Bxh3!? 12.Be4 (12.gxh3 Rxb7 13.c3 (0.02)) ...Be6 (12...Bd7 13.a3 Nc6 14.c4 (0.54); 12...d5 13.gxh3 dxe4 14.Qxe4 (0.70)) 13.Ng5 (0.81)
10.Bg5N!? (0.00)

A novelty found in analysis several months prior to this game. Urquhart had already encountered this move in several of our previous games so his reply was automatic.
At first glance the bishop seems oddly placed here due to its seeming vulnerability and the fact that it really attacks nothing of too much importance. The pawn on e7 is protected by the knight and queen for instance.
So whats the idea behind the move then? Well to put it quite simply the vulnerability of the bishop acts as a lure to attract Black's attention, specifically the black queen.
Notable moves that were previously played by some top players include:
- 10.Bf4 (-0.38) which was the previously mentioned, Adorjan-Hort, Budapest 1973 (1/2-1/2)
- 10.Nc3 (0.00) is Shamkovich-Keene, New York 1980 (1-0), also previously mentioned.
 |
| The Urquhart Lure |
...Qf5 (0.25)
Played instantly as previously mentioned. The queen threatens to win the bishop after ...Bxf3 which is the immediate threat. There may also be threats on c2 should Black's knight ever arrive on b4.
There are of course other ways to play here:
- 10...h6 11.Bh4 e6 12.Bxc6 bxc6 (but not 12...Qxc6? because of 13.Be7 (1.08)) 13.Nbd2 f5 (0.22) with chances for both sides.
- 10...dxe5 11.dxe5 and now (A)11...Nxe5?! leads to complicated play i.e. 12.Bxb7 (12.Bxf7+ is very tempting because of ...Rxf7 13.Rxd7 winning the queen but after ...Nxf3+ 14.gxf3 Bxd7 (0.19) Black has a rook and bishop for her and roughly equal chances. I'd much rather play Black here.) 12...Bxf3! ignoring the attack on the rook, and now 13.gxf3 Qf5 14.Bxe7 Rb8 (...c6 15.Nd2 (15.Bxa8?? would be a mistake on account of ...Nxf3+ 16.Qxf3 (16.Kh1? Qh3 (-14.52)) 16...Qxf3 (-3.40)) 15...Rb8 (0.10))15.Be4 Qh3 16.Nd2 (0.52) (or =16.Bxf8) Complicated indeed!; (B)11...Qf5 (0.17) is also good and roughly equal to the text. (C) 11...Bxf3 12.gxf3 Qf5 (0.21) is unclear.
The fact that the text looks so natural and good adds to the strength of White's novelty in regards to luring Black down a specific path. There was no reason for Urquhart to deviate as he had had excellent results up until this point with the move and he obviously suspected nothing of the improvement I had just up ahead...
11.Bxc6!? (0.24)
Giving up the bishop for knight unprovoked is not usually my norm as I tend to value the Bishop Pair dearly, however I needed to lead my opponent towards the trap ahead and this was the way.
 |
| Heading towards despair |
...Qxg5 (0.52)

Again, previously played.. Had Urquhart suspected any home cooked improvements he might of considered an alternative course here. Mainly the intermediate move...
- 11...Bxf3 (0.15) where after 12.Bxf3 Qxg5 the intermediate exchange on f3 makes all the difference in avoiding the pitfalls ahead. Komodo evaluates the position as roughly equal here.
12.Bxb7 (0.52)
The only way to maintain the advantage and quite natural. White grabs a pawn and threatens the rook.
...Rb8 (0.60)

It's worth mentioning that the alternative try 12...Bxf3 (0.78) may of been rejected because of the complications which are inherent after 13.Bxf3 Rb8. First of all White has many ways to continue here and Urquahrt would of realized that he might have to spend some time sorting out all the possible outcomes of each one. Not very practical in a rapid game to say the least. Let's look at some of the possibilities here:
- 14.Nbd2 (0.89) By far the best move for White according to the engine but it wouldn't of been so easy for me to find otb back then -even today it wouldn't of been easy!. My first reaction would be to try and neutralize the attack on my b2-pawn or perhaps to lash out with an attack of my own (i.e. 14.exd6). The move of course does protect the pawn but in a tactical nature. Regardless though had I found it Urquhart would have to burn up more clock trying to figure out why I didn't protect the pawn. He may then of reached the conclusion that after 14...Rxb2 15.Nc4 Rb8 (1.13) the knight coming to c6 would be very unpleasant for him.
- 14.Nc3 (0.46) Also ignores the threat to the pawn but after...Rxb2 15.Ne4 (0.56) it couldn't of been too palatable to realize the queen would have to retreat to the dismal h6-square -after of course looking at the other less appetizing alternatives; Qf4, Qh4 and Qf5.
- 14.exd6 (0.41) This intermediate capture would of also had to be considered and with it the best way to recapture (...Nxd6). Not a critical line but one that would need consideration and time.
- 14.Re1 ( 0.20) Also not critical but a consideration none the less. Here he might of concluded that White stood better after 14...Rxb2?! (better is 14...c5! (0.11) 15.Na3 Rb8 16.Nc4 where White is active and he still will have problems getting his knight on the back rank back into the game.
- 14.b3 (-0.09) A natural continuation blunting the rook on b8. However this also opens up tactical opportunities now for the bishop on g7 against the rook on a1 should a pawn skirmish happen in the center. This may of been one of Urquhart's major considerations when looking at the line.
- 14.c3 (-0.10) Another strong candidate of a natural and possible move and one that would have to seriously been considered by Black. White protects the pawn on b2 now with his queen but she could be lured away perhaps. A possible line could run with 14...dxe5 15.dxe5 Qxe5 16. Qxe5 Bxe5 17.b3 Nd6 (-0.16) with about even chances for both players.
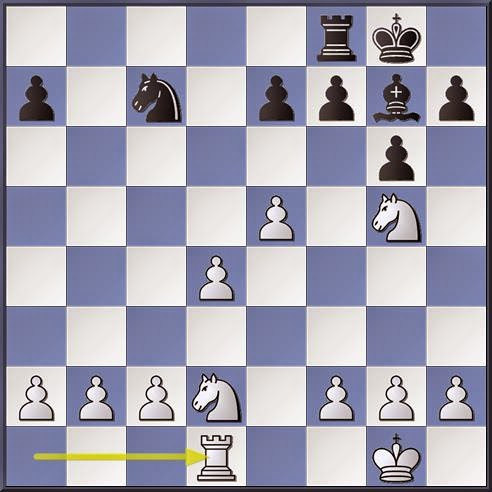
Now getting back to the game, here's the position again after 12...Rb8
|
| position after 12...Rb8 |
It's White to play here. What would you do?
A picture to hide the answer while you think.
 |
| Candidate Master Don Urquhart |
The man himself, Candidate Master Don Urquhart.
Some of his accolades include:
- Winning the Indiana State Closed Championship in 1999.
- Beating the very formidable three-time U.S. Champion GM Nick De Firmian in 1986 at a tournament in San Francisco. You can view this game here.
- In 1982 Don was invited to play in the now defunct Lone Pine International Tournament in Lone Pine, California. This prestigious tournament had been going on consecutively since 1971, however only months before the start, in a cruel twist of fate, the tournament was cancelled abruptly due to an illness of its sponsor Louis D who died the next year and the tournament along with him. This lost opportunity to possibly make a name for himself in such a renown international event was an open wound that followed Don for years.
So after a short calculated deliberation I played
13.Nbd2! (0.43)

A fantastic move and the novelty which I had cooked up a month ago! The knight hops into the game at a critical moment ignoring the threat to the bishop on b7! No credit for anything else.
The move sets a very subtle trap but to be sure I wanted to bait it further. So during the game I even added a bit of theatrics by picking up the knight and then hesitating for about twenty seconds, holding it suspended over the board while fixing my gaze on the hanging bishop. I even shook my head very subtlety and then with a barely audible sigh placed the knight on the d2-square and waited patiently for my opponents reply. Some may view this sort of thing as unethical but I disagree.
So what would you play here as Black?
 |
| Setting the Trap by Eastman Johnson Oil on canvas 1863 |
After what seemed like an eternity (about 20 seconds) Urquhart played
...Rxb7? (1.19)

...taking the bait and plunging into the abyss.
Had he not fallen prey to my theatrics and had time to fully analyse the position he might of found a way to circumvent this slip. Let's look at some of these ways:
- 13...Qf5 (0.45) The best try. White has a small edge but it's still anyone's game.
- 13...Qf4 (0.47) Virtually no different than ...Qf5. Either move is good.
- 13...dxe5 (0.57) Third best but still good. Black is very much in the fight still.
Any one of these moves might of saved Black but not anymore. The trap is about to be sprung...
White to play. What would you do?
 |
| plunging into the abyss |
14.Qe4! (1.19)
The point! White escapes the pin and now both the black rook and queen are under attack!

I played the move instantly, banged my clock and stood up. This got the attention of the other players who began to crane their necks to see what was going on... some wandered over. Urquhart looked visibly shaken and after the shock wore off he went into the tank for a good long time...
...and ten minutes later (an eternity in a 15 minute game) he emerged with the best possible defense, a credit to his strength as a player when facing adversity.
So what did he play?
 |
| Thinking Machine 4 in action |
Thinking Machine 4
The fourth generation and first internet edition of a chess playing program by Martin Wattenberg that displays in beautiful graphic forms, all the moves each player can make whilst a game is in progress.
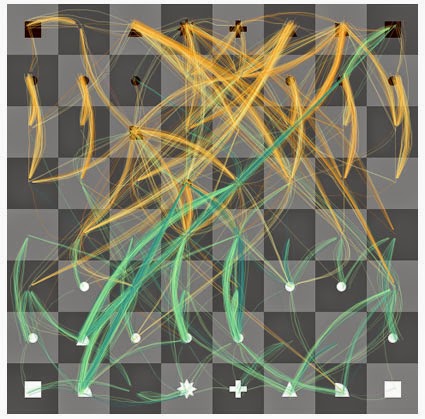
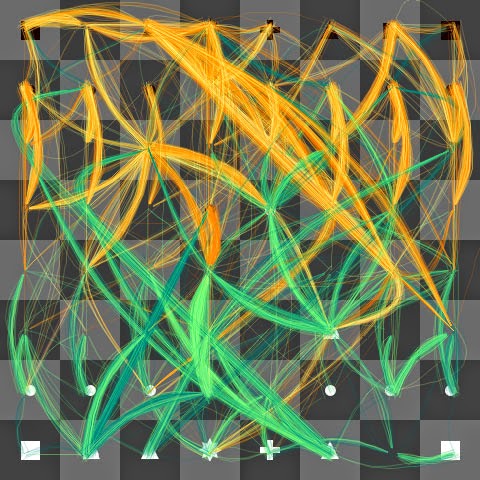
When it's the machines turn to play a network of visual curves is overlaid on the board (see image above). The curves show potential moves--often several turns in the future--considered by the computer. Orange curves are moves by black; green curves are ones by white. The brighter curves are thought by the program to be better moves.
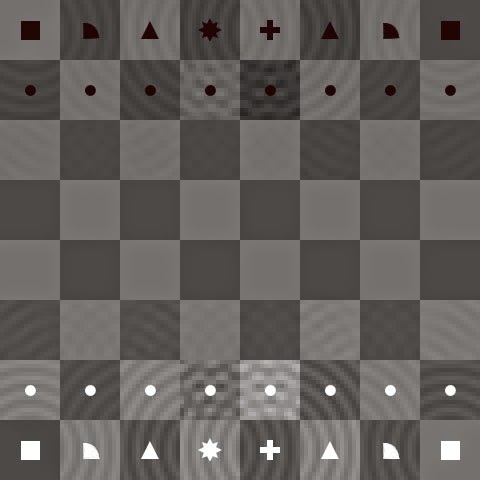
When it's the players/viewers turn the board display will gently pulse to show the influence of the various pieces as shown in the following graphic:
 |
| Waves of influence as the player/viewer thinks |
Wattenberg says, "The chess playing engine is designed to be at the same level as the average viewer of the piece. If you're a tournament chess player, you would clobber most casual players--and you'll clobber Thinking Machine 4 too. If you barely remember the rules of the game, the artwork may clobber you instead. The chess engine we built is simple and uses only basic algorithms from the 50s (alpha-beta pruning and quiescence search). The program's unconventional initial moves may raise eyebrows among experts: we did not give it an "opening book" of standard lines since we wanted it to think through every position. The goal of the piece is not to make an expert chess playing program but to lay bare the complex thinking that underlies all strategic thought."
And its predecessors?
- Thinking Machine 1, built in 2002, was an exploratory version that was similar in concept to No. 4 but was completely different graphically and technically.
- Thinking Machine 2 was an installation similar to No. 4; it was shown at the London ICA, 2003, as part of the work of MW2MW show.
- Thinking Machine 3 was an improved installation shown at Ars Electronica, 2004, as part of the "Language of Networks" exhibit.
So getting back to the game Urquhart emerges from the tank and plays
...d5! (0.99)

A fantastic defense and the best one according to Komodo. The sacrifice of this pawn is the first step in Black's defensive idea. On the surface the pawn both attacks the queen and blocks the diagonal of the attack on the rook, but that's not all. The move has another motive behind it that we will soon see.
So I'm on my own now, in uncharted waters. I'm not sure why I didn't go further in my prep than the initial 14.Qe4 but now I had to burn up some clock to find the right course.
15.Qxd5 (0.98)
An obvious reply but also the only move as everything else is losing for White. This forcing nature is another positive aspect of Black's last move.
...c6 (1.00)
Sacrificing another pawn. This holds the same idea as Black's previous move; attack the queen while blocking the attack on the rook and furthering the true aim of the defense. Can you see the full shape of Black's defensive idea yet? If not you will soon.
16.Qxc6 (1.04)
Also forced.

Can you now see Black's idea? What would you play here?
A simplified example of Thinking Machine 4 in action during a live game while you decide on your move.
 |
| Opening: waves of influence |
 |
| Opening: the machine's thoughts |
 |
| Middle Game: waves of influence |
 |
| Middle Game: the machine's thoughts |
 |
| Endgame: waves of influence |
 |
| Endgame: the machine's thoughts |
Here is the website for Thinking Machine 4 if you'd like to try it out for yourself.
Now back to the actual game
...Rc7! (1.08)

We can now see Black's defensive idea in full bloom. The rook is now protected (by the knight) and attacks the white queen. Furthermore when the queen moves away the black counterpart will also escape the threat from the white knight and when the smoke has cleared White will be down a piece for three pawns, which in some circumstances is adequate compensation. Unfortunately this is not one of those circumstances as Black will easily consolidate his position and dominate with his extra piece.
I began to panic somewhat as the seconds ticked off the clock. Had Black found an unforeseen hole in my prep? Did I miss something or stray off the path somehow during the last couple of moves?
Then after a few minutes of intense scrutiny I suddenly found the solution! Needless to say I was quite elated... and relieved.
What move did I find?
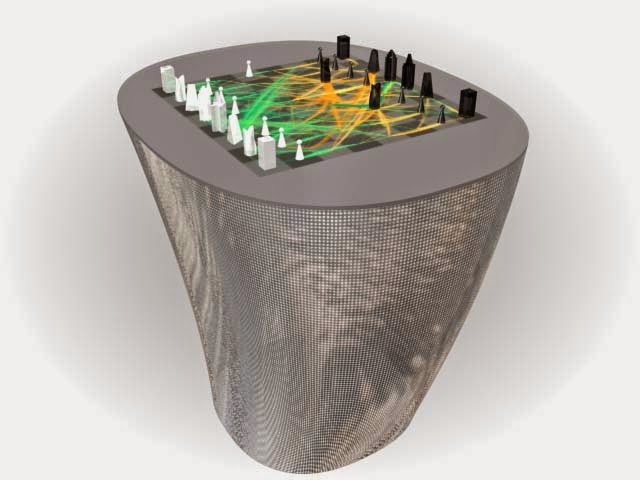 |
| Thinking Machine 5: Thinking Table |
A few more shots of Thinking Table...


This concept when completed would be an interesting feature at selected chess events and/or various exhibitions as well as on a museum tour or sorts.
Now back to the game.
Here like a thunderclap I played...
17.Qxc7! (1.05)

Just taking the rook anyway! Urquhart looked visibly shaken for the second time in the game. He obviously had not considered this idea in his calculations or perhaps had hoped I wouldn't find it.
Now White is temporarily up the exchange plus three pawns which should be just a technical win from here but with the clocks ticking away and so many pieces -plus the queens!, still on the board anything can happen in the complications.
At this point Urquhart was down to seconds on his clock (I had about six minutes) and had probably consoled himself to the fact that he was going to lose this game so failed to find the best continuation. You however are not.
Black to play here. What would you do?
 |
| Determination |
...Nxc7? (3.04)
Battered and bruised and with mere seconds remaining, Urquhart fails to find the best continuation and instead delivers a lethal and self inflicted blow to himself. To his credit the solution is not an easy one to find.
If you found 17...Qxd2! (1.08) then Bravo! Here Black can easily fight on after any of the myriad of possible replies by White. Let's look at a few of them:
- 18.Qxe7 (1.25) ...Qxc2 19.Qa3 Qe4 20.h3 Bxf3 21.Qxf3 Qxf3 22.gxf3 Nc7 with plenty of play left.
- 18.Qc5 (1.25) ...Qf4 19.Rd3 e6 again with play.
- 18.Rxd2 (1.04) ...Nxc7 19.c4 Rb8 and the win is still a long way off for White.
- 18Qxa7 (0.94) ...Qxc2 19.Qxe7 Qxb2 20.a4 Qc3 21.Qa3 Qa5, etc.
18.Nxg5 Bxd1 (3.19)
So Black gets the exchange back, a small consolation in light of his three pawn deficit and almost depleted time.
19.Rxd1 (3.19)
Resigns
1-0
 |
| Final position |
Of course there is still some play left in the position but it's almost a futile task being down to just the increment.
A very gratifying win for me. True that the winning idea was cooked up in home prep but I still had put the time and effort into its research and to eventually execute it at at the board. Not to mention finding my way through his superb defense and of course the key move; 17.Qxc7!
Another giant slain!
 |
| David and Goliath by Michelangelo Sistine Chapel fresco 1509 |